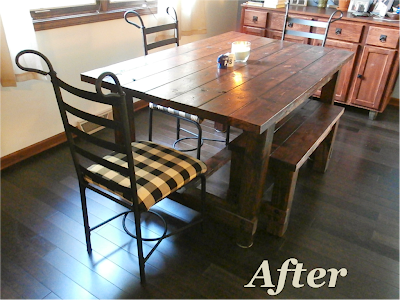
Have I told you that my talented and hunky hubby made a farmhouse table and bench from scratch? I thought I had forgotten that! Well, he did such an amazing job that our old chairs were looking pretty shabby next to this gorgeous table, so I set out to make them over.
These chairs came with the table set I bought at Wal-Mart nine years ago. This set served us pretty well. It lived in six different homes in that time and had a couple of dings and dents, but held it together. We gave the table away this summer, but I wanted to salvage the chairs, if possible. Dining chairs are expensive! And I couldn't bare to spend more money on chairs than we spent on the whole table and bench creation.
So, my super-limited DIY skills came into play! First, I removed the cushions from the metal frame. The chairs were a rough bronze/black color, and if I were an actual photographer with an actual camera, you would be able to tell that.
Then I took the chairs outside for some spray painting. I used a flat black spray paint and each chair got two coats and a little more for good luck. Since the metal was rough, it was hard to cover everything the first time through.
Next up, recovering the chairs, which was the step that made me the most nervous. I found this fabric at Hobby Lobby this summer, and I have no idea how much we spent on it, maybe $25 for two yards, which was plenty. We picked this fabric because it was kinda country, pretty neutral, and just nice. I was originally thinking something more match-matchy with the blue wall and brown couch, but this was definitely the right away to go.
I roughly followed a tutorial found on House Updated (which does a much better job of detailing this process that I do!). Basically I just treated it like wrapping a present. Lay out your cushion on the fabric and cut out a square. Staple, staple, staple, while pulling your fabric tight. And when it comes to the corners just mess with it until it works. Done!
But it does help the process if you have a puppy acting as supervisor. Or trying to eat your scrap fabric, whichever.
Next up came the hardest part, which I do not have pictures for, because it was super hard, and that was reattaching the cushions to the newly painted chairs. Since I don't use power tools, I was trying to screw the pieces together with a normal screwdriver. It worked for a while, but just this weekend, two screws fell out of my chair. Doug fixed that with a quick buzz of the drill, so no harm done. But I was trying to get these chairs together the same day we were expecting some of Doug's friends over. So, his friend walks in our house and I'm still screwing chairs together. I'm a great hostess!
But take a look at that final product! It was totally worth the paint fumes and staples and hand cramps from using a manual screwdriver to do a power tool's job! I love the chairs and they look great with the table. Plus, we can just keep painting and recovering forever! I say why not when my chair's look this good!
How about some before and after shots?
Please forgive the poor picture quality. I'm a reader, not a photographer. But don't you love the contrast with the black chairs? I do. This is the one space in our house that feels really finished to me. But don't turn around (or you're gonna see my heart breaking-shout out to Ace of Base fans!) or you're gonna get a glimpse of the kitchen, which is in serviceable, but not pretty, shape.
And that is my completely easy and unscientific method for revitalizing cheap Wal-Mart chairs!
Happy DIYing!


No comments:
Post a Comment